MassCEC’s whole-home air-source heat pump pilot program has been running for about seven months now. See our previous monthly blog updates for more information.
We have 27 approved projects—the same number as last month. Although there are a few more projects currently under review, overall we’re not seeing as much uptake of the pilot as I was hoping for. A big goal of these monthly blog updates is to be transparent about the challenges that we’re facing so that we can get feedback. To that end, if anyone reading this blog has ideas for outreach strategies or suggestions for changes we should make to the pilot, please email me.
As we start to really get into the first winter of this pilot, I’m going to focus this blog post on best practices that heat pump owners should use to keep their system happy and healthy.
Step 1: High Quality Installation
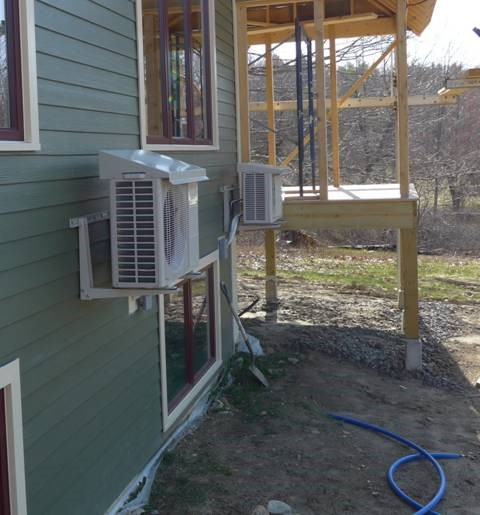
The best way to prevent heat pump performance issues down the line is to install them properly. In the July update, I shared MassCEC’s inspection rubric for the whole-home pilot, which is largely drawn from the Northeast Energy Efficiency Partnership’s Guide to Installing Air-Source Heat Pumps in Cold Climates, in an effort to build on the work that they’ve done and promote regional consistency. In the July posting, I emphasized the importance of mounting the outdoor units above the snowline. We’re getting to the time of year where that becomes really important. Even if your outdoor unit is mounted a foot or two off the ground, it could still require some shoveling in high-accumulation snow storms.
Another installation best practice is to avoid installing outdoor units directly under any drip line from the roof or other overhang that would subject them to falling snowmelt, ice, or concentrated rain runoff. If that’s unavoidable, one solution is to install a drip cap, shield or “hats” approved by the manufacturer. These are very common in other parts of New England, but for some reason they have not been as widely adopted in Massachusetts yet.
One other installation best practice that we highly recommend is to avoid condensate pumps if possible. When heat pumps are in cooling mode, their cold coils remove moisture from the air (like other types of air conditioning), which needs to be drained somewhere. The best practice is to design the drain so that it slopes downhill and gravity can carry the water down the drain to an outdoor location (away from crawl spaces, walkways and outdoor equipment). Condensate pumps are necessary if the drain pipes are designed to go up (maybe through an attic), but they are an additional piece of equipment to maintain, so we recommend that installers avoid them if they can.
Step 2: Maintain the Heat Pump
Once the heat pump is installed, it is important to maintain the heat pump. The Department of Energy says, “The difference between the energy consumption of a well-maintained heat pump and a severely neglected one ranges from 10% to 25%.”
There are steps that heat pump owners can take to help a heat pump operate as efficiently and cleanly as possible.
- Keep the outdoor unit clear of leaves, snow, ice, and debris.
- If there’s ice buildup in an outdoor unit, talk to an installer.
- Trim back any plants or bushes that are encroaching on the heat pump.
- Make sure outdoor and indoor units have an unrestricted airflow.
An owner can clean the indoor unit’s dust filter themselves. Watch this video from Insource Renewables in Maine for a step by step guide on how to clean filters for ductless units. They can be washed in the sink or cleaned with a vacuum cleaner. Cleaning the filters helps the units operate efficiently; if the filters are completely clogged there is less air circulation over the heating coil, which can limit the heat that the indoor unit can put out. Additionally, if dust and debris builds up in the heat pump, it could potentially clog the condensate drain. Recommendations on how often to clean the filters vary from every few weeks to every few months; owners can see how quickly dust builds up in their unit.
If mold builds up in the unit, we recommend calling an installer or another HVAC professional for a deeper clean of the indoor unit. Last spring, I was wandering around my neighborhood street fair when an unusual sweatshirt caught my eye: “We Clean Heat Pumps.” The owner of the sweatshirt was Gabriel Erde-Cohen, who also owns a business of the same name, solely devoted to cleaning heat pumps. Erde-Cohen started his business in Vermont in the spring of 2018 to service a few heat pump customers for his wife and father-in-law's solar electric and heat pump business. Since then, he has grown his business so that he now works in every county in Vermont. His business is currently expanding into Western Massachusetts, as well as the Boston area, and Martha’s Vineyard.
Similar to other heating systems, we recommend that an installer or another service professional comes to do a routine maintenance on the heat pump every year or two to ensure that everything is working properly. It will be interesting to see if the business model of We Clean Heat Pumps catches on, but, in the meantime, a heat pump installer is probably the best place to start if an owner needs routine maintenance or a deeper clean. Many installer companies have a dedicated maintenance staff.
Step 3: When There is an Issue
As with any HVAC system, sometimes things can go wrong, and a heat pump installer is probably the best place to call to get a system up and running again.
I spoke with Nate Mallard of Muirfield Mechanical about his experience with heat pump service calls. He said that he sees heat pump service calls at a similar rate to traditional boiler and furnace service calls. The reasons for the service calls are varied, but he described a couple of issues that he’s seen reoccur. One issue that he’s seen trigger heat pump service calls is a refrigerant leak. Without the right level of refrigerant, the heat pump cannot move heat around effectively, and it may have a reduced capacity or stop working all together. Nate said that the refrigerant piping can leak if it is damaged by home renovations. Under normal conditions, a heat pump should not leak any refrigerant. Installers pressure test refrigerant line to ensure that there are no leaks. Nate estimated that it could take three to six hours to hunt down a refrigerant leak, repair the leak, and recharge the system.
A second issue that he has seen cause service calls is circuit board failure. Based on his experience, this is a relatively simple fix that just requires swapping out the circuit board, which takes around an hour.
Here’s to a warm and toasty holiday with your heat pumps!